Thursday, August 4, 2016

Super Crispy Roasted Pork (Non - Halal)

I have been wanting to share this fail proof recipe adapted from Christine's Recipes that I have tried and tested umpteen times. 

I got this recipe when I purchased Christine's recipe book and I am blessed with detailed pictorial recipes. Thank you Christine. 

Coming back,  I can assure you that once you get your hands in baking this Super Crispy Roasted Pork, you may not want to pay the high price buying Roasted Pork from stores outside.

Like what Christine mentioned in her blog, the only disadvantage of making this dish is the hard work needed to clean the oven after baking the Roasted Pork, as the oil will crisp to splash all over the oven. However, as the Crispy Roasted Pork is so savoury in taste that I am more than willing to do the clean up.

A word of caution, this Super Crispy Roasted Pork is really addictive and by just looking at the photo image makes me salivate all the time. 

Super Crispy Roasted Pork (Non-Halal)

Ingredients:

580g     Pork Belly
1 tbsp   Shaoxing Wine (Chinese Cooking Wine)
Some   Sea Salt (to sprinkle over the top of the pork rind before bake)

Seasonings:

1tsp     Sea Salt
1tsp     Caster Sugar
1tsp     Five Spice Powder

Method:

Step 1: When buying pork belly from the market, be sure to request a mix layers of meat and fat. Do not buy pork belly that have too thick fat especially on the layer just below the pork rind. 

 Step 2: Clean and remove the hair from the pork rind.

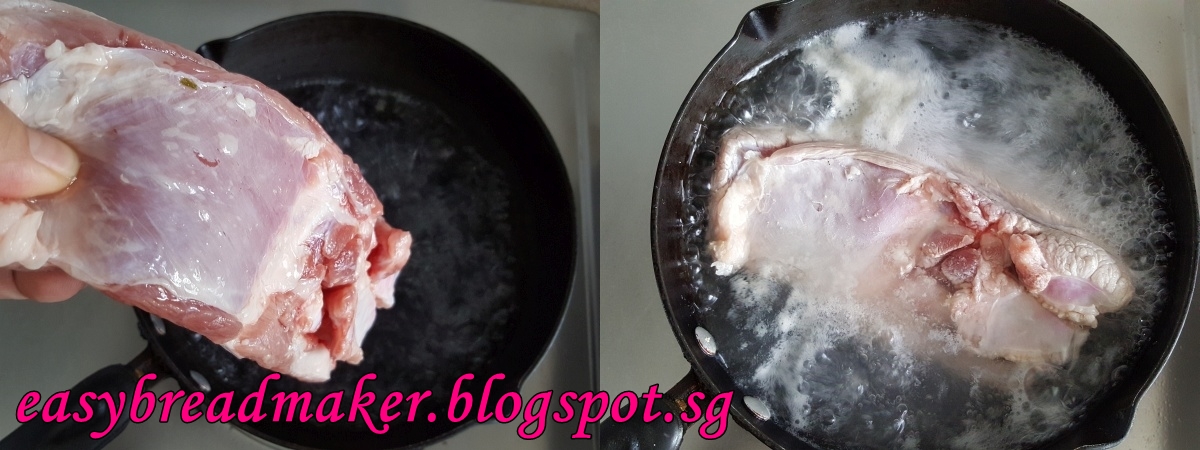
Step 3: Boil a pot of water and parboil the pork belly for 5 minutes. Make sure that the pork belly is put into the pot with the pork belly skin facing down. This is to ensure that the pork belly will stay in shape after the parboil.

Step 4: Remove the pork belly and rinse with water. Again, clean and remove hair from the pork rind. 

Step 5: Slit the meat part of the pork belly in criss-cross. This is for later use when we marinade with seasonings. 

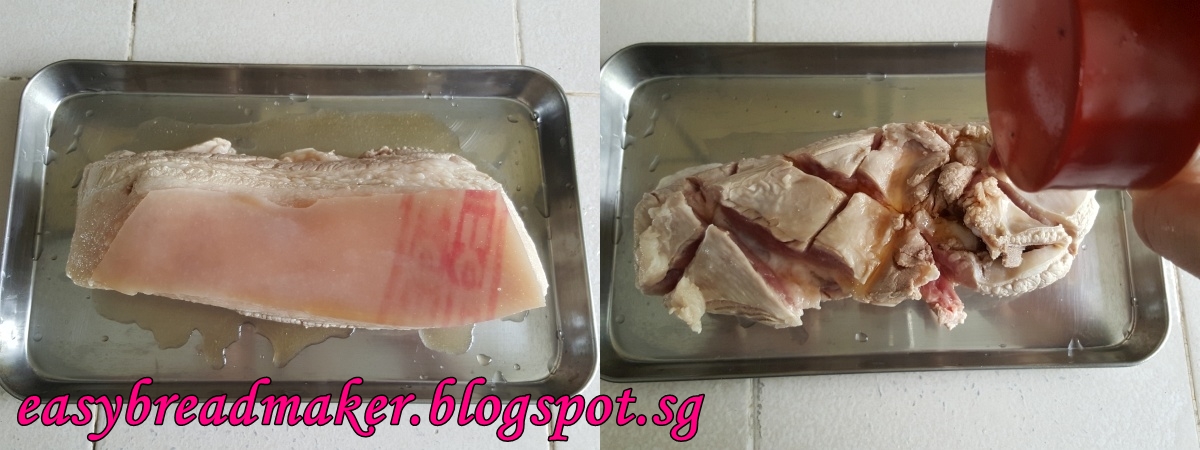
Step 6: Marinade the parboiled pork belly with Shaoxing Wine and leave to rest for 15 minutes. 

Step 7: Meanwhile, prepare aluminium foil in the shape of the pork belly and mix the seasonings ingredients for later use. 

Step 8: Once the 15 minutes are up, lightly poke the surface of pork rind with a meat tenderizer tool as shown. When poking the pork rind, do not poke too deep into the fats of the pork belly as it will deter it from being crisp at the baking stage.  

Step 9: Overturn the pork belly and spread the premix seasonings over the meat part. Ensure that the seasonings do not touch the pork rind. Otherwise, the skin will be darken when baking.

Step 10: Transfer the seasoned pork belly to the aluminium foil prepared earlier and put into fridge to dry the pork belly. Many recipes call for marinating at this stage either overnight or at least 3 hours which I usually do with 3 hours. But as I am running out of time today, I marinated the pork belly for only 45 mins, it still tasted as good.

Step 11: Remove the marinated pork belly from fridge and let rest for 15 minutes at room temperature. Wipe dry the pork rind and then, lightly poke the pork rind again. As a note, the more it is being poked, the more crispy it will be but then again, be cautious not to poke too deep into the pork fat.

Step 12: Preheat oven to 200°C and spread a thin layer of Sea Salt over the pork rind. Transfer the pork belly to the oven to bake for 45 minutes on the middle rack. Then move the baking tray to the upper level and increase the temperature to 220°C, bake for another 15 minutes or until you see bubbles appearing evenly on the surface of pork rind.

Step 13: Once it is baked, remove the layer of sea salt and check whether the pork rind is evenly baked. If otherwise, you may put it back into the oven to bake a little longer. 

This is why I am calling this Super Crispy Roasted Pork and every time I looked at the photos of my previous bakes, I would always wanted to savour it again the next day. Highly Recommended to try yours.

Sunday, July 17, 2016

Instant Coffee Soft Loaf

Following my earlier post on Experimenting with Coffee Soft Loaf, today I am sharing this recipe that I am satisfied so far after several attempts. Comparing this recipe with Hokkaido Loaf that is more milky, I like this recipe for its softer texture though the coffee aroma does not give me the "Oomph". Probably I shall get hold of a bottle of the Gold Version Coffee Powder for my next try.

Instant Coffee Soft Loaf (750g Loaf Size)

Ingredients:

1            Egg (60g)
180g      Fresh Milk
40g        Caster Sugar
4g          Sea Salt (3/4 tsp)
35g        3-in-1 Instant Coffee Mix (1 pack)
1tsp        Instant Coffee Powder
270g       Bread Flour
30g         Cake Flour
1tsp         Instant Dry Yeast

Ingredients for Instant Coffee Soft Loaf


Method:

Step 1: For my BreadMaker, I would need to pour in the liquid ingredients first follow by dry ingredients. In this case, break the Egg into the Bread Pan follow by Fresh Milk.

Step 2: Then, add on Salt and Sugar on each opposite side of the Bread Pan.

Step 3: After which, pour in the 3-in-1 Instant Coffee Mix follow by 1 teaspoon of Instant Coffee Powder into the Bread Pan.

Step 4: Measure the Bread Flour and Cake Flour to pour into the Bread Pan. Make sure that the Flour covers all the liquid ingredients. Then, dig a hole in the center to pour in the Instant Dry Yeast into the Bread Pan.

Step 5: Now, transfer the Bread Pan to the Bread Machine and lock the pan.

Step 6: Switch on the Bread Machine and set to Basic Function.

Step 7: As my machine has prefix 750g Loaf Size and Medium Crust, you will need to select the function for your machine accordingly. Don't forget to set the Bread Machine to Start.

Step 8: These images were at the 1st Proof Stage from my few trials of the same recipe. If you encounter the dough like on the Left Image, rest assured that it is perfectly okay to continue as this recipe contain a slightly higher hydration. You may also assist the Bread Machine to lightly scrape the dough that sticks to the sides of the Bread Pan. The Right image was what I have gotten in one of my Lucky Bakes that the dough forms perfectly nice on First Proof.

Step 9: Whether my First Proof forms a splashy or nice dough (like the images above), after the Second Proof, a beautiful Bread Dough will form and this prepares for baking at the last hour of the entire process.

Look at this wonderful bake of Instant Coffee Soft Loaf that cracks on the top. This equals a high hydration and therefore, a really Soft Loaf. Try yours today.

Tuesday, July 12, 2016

Experimenting Coffee Soft Loaf

For the past week, I've been experimenting on baking a Coffee Soft Loaf.

Experimenting new recipe of Coffee Soft Loaf.

As you can see from the image, the dough after First Proof shows as though I'm going to fail but to my surprise, after the Second Proof, the dough looked perfectly good and therefore, giving me a Soft Loaf. However, although I used 35g of 3-in-1 instant coffee, this Coffee Soft Loaf did not give me a good Coffee aroma and taste. Hence, I am going to experiment further before sharing the final recipe with You.

So stay tune.

Saturday, June 25, 2016

Pandan Coconut Milk Hokkaido Buns, courtesy from a friend

Following my post on Pandan Coconut Milk Hokkaido Loaf with Raisins, yesterday my friend tried this recipe that I am highly recommending, using her Panasonic Breadmaker. Being her first time using the machine, she happily followed the sequence of pouring the ingredients into the bread pan that I have stated ie. the liquid ingredients first, follow by dry ingredients and finally, yeast. Do note that this sequence applies to most of the commercial breadmaker except Panasonic.

She transferred the bread pan to her Panasonic Breadmaker and started the machine but it didn't move at all. She messaged me asking for help and we both troubleshoot to find that the sequence of pouring the ingredients for Panasonic is the yeast first, follow by dry ingredients and finally liquid ingredients, as oppose to the sequence of my Aztech Breadmaker. 

My friend had quickly transferred the ingredients to her mixer to prepare the dough, manually kneaded the dough, proved the dough twice like what the breadmaker does and finally, baked it in her oven. 

This was what she had gotten, a wonderful and beautifully baked Pandan Coconut Milk Hokkaido Buns. And it is really great to know that the buns are well-liked by her family.

Photos courtesy from my friend.

And if you have got a good mixer at home or using your strong arms, it is always possible to follow our recipe, manually knead them into dough and finally baking into buns instead of a loaf.

As a footnote, when following any bread machine recipe, always compare that with your bread machine's operating manual to confirm the sequence of adding ingredients, as different breadmaker may work differently. 

Happy Baking!

Friday, June 24, 2016

Pandan Coconut Milk Hokkaido Loaf with Raisins

My sincere apologies for being away for close to 2 months. Cutting long story short, I went on a 3 weeks' holiday and was contracted with conjunctivitis. Cut short my trip and the doctors here gave me another 3 weeks of MC. As conjunctivitis is contagious, I have a "No Touching of Flour" holiday. 

Coming back to my love for Hokkaido Loaf, I tried many recipes with Pandan flavor for months but none gave me the satisfaction until this very one that I would like my friends here to try.

Pandan Coconut Milk Hokkaido Loaf with Raisins (750g Loaf)

Ingredients:

1              Egg (55g)
10g         Coconut Oil
100g      Coconut Milk
100g      Fresh Milk
1/4 tsp   Pandan Paste
40g        Caster sugar
4g           Sea Salt (3/4 tsp)
280g     Bread Flour
30g        Cake Flour
15g         Milk Powder
5g           Instant Dry Yeast (1 + 1/2 tsp)
70g        Raisins

Ingredients for Pandan Coconut Milk Hokkaido Loaf and mind you, the Egg is missing from the Image. My apology.

Method:

Step 1: Firstly, break the Egg into the Bread Pan, follow by the Coconut Oil, Fresh Milk and Coconut Milk.

Step 2: Pour in the Pandan Paste; In this bake, I am using the commercial Pandan Paste that is replaceable by extracting from Fresh Pandan Leaves. After which, add on Salt and Sugar, each on opposite sides. This is very important Rule of Thumb for baking bread using Breadmaker and do remember it by heart.

Step 3: Measure the Bread Flour, Cake Flour and Milk Powder altogether and pour in to the Bread Pan. Be sure that the Flour mixture should cover all the liquid ingredients. Then, by using the measurement spoon, dig a hole in the center.

Step 4: Pour in the Instant Dry Yeast. Voila, you are ready to go!

Step 5: Transfer the Bread Pan to the Breadmaker and Lock the Pan. Set the machine to Basic Function, follow by 750g Loaf Size and Medium Crust. Press Start thereafter.

Step 6: Meanwhile, weigh the Raisins to pour into the Bread Pan when the machine beeps 5 times.

Step 7: When the Breadmaker beeps, pour the Raisins into the Bread Pan. As a side note, this combination is a little wet on the dough when it first started kneading but rest assured that it is okay. You can now either sit back and relax waiting for a fresh loaf or you can occasionally peep into the machine like what I usually do.

Step 8: This will be the dough during the First Stage and Second Stage of Dough Proofing Process in the Bread Machine. After the Second Proof, the Bread Machine shall start to bake. So no more peeping thereafter.

When the 3 hours cycle completes, this is the beautiful Pandan Coconut Milk Hokkaido Loaf that you will get. Remember to cool the Hokkaido Loaf before you cut the Loaf, otherwise it will become wet.

And this is the green Pandan colour that you will be having and trust me, this Recipe is surely to keep. The loaf is soft and the aroma of the Coconut Milk makes me feel really hungry, even when I'm writing this. Do try and let me have your feedback.

Friday, April 1, 2016

Healthy Yakult Soft Loaf with Raisins

When I ran out of Fresh Milk to bake a soft loaf, I put on my thinking cap to find a replacement and I am happy to present to you this newly created recipe.

Healthy Yakult Soft Loaf with Raisins (750g loaf)


Ingredients:

100g  Ace Light Yakult Drink
100g  Whipping Cream
1         Egg (60g)
35g     Caster Sugar
4g       Salt (3/4 tsp)
270g   Bread Flour
30g     Cake Flour
15g     Milk Powder
5g       Instant Yeast (1 + 1/2 tsp)
70g     Raisins

Ingredients for Healthy Yakult Soft Loaf with Raisins.

Method:

Step 1: Pour in Liquid Ingredients i.e. Yakult, Whipping Cream and Egg into Bread Pan. Then, pour in Sugar and Salt on each opposite side of the Bread Pan.

Step 2: Add in Dry Ingredients i.e. Bread Flour, Cake Flour and Milk Powder. Then, dig a small hole in the center and pour in the Instant Dry Yeast. 

Step 3: Transfer the Bread Pan to the Bread Machine and Lock the Pan. Select Basic Function, follow by 750g Loaf Size and Medium Crust. Press Start thereafter.

Step 4: When the Dough is formed, it tends to be a little sticky and wet. While the machine continues to run, help the machine by scraping down the dough when it sticks to the wall of the Bread Pan. 

Step 5: Measure the Raisins to pour into the Bread Pan when the machine beeps 5 times.

Step 6: This will be the Dough during the First Stage and Second Stage of Proofing Process in the Bread Machine. In between, the machine shall beep 5 times to indicate for a pour in of the Raisins. After the Second Proof, the machine shall start to bake.

And this is the Healthy Yakult Soft Loaf with Raisins that you will get.

The texture of the Healthy Yakult Soft Loaf is similar to the Super Soft Hokkaido Loaf that was introduced earlier and it is really not too bad of an outcome. Try yours today if your kitchen runs out of Fresh Milk.

Tuesday, March 22, 2016

Super Soft Hokkaido Loaf

I have not been baking bread for some 2 months due to an extremely busy schedule and today, I thought of my Super Soft Hokkaido Loaf that I had tried out earlier producing me a Super Soft Hokkaido Loaf compared to my first version of Creamily Aroma Hokkaido Toast. I have reduced the whipping cream proportion and add on some fresh milk. All other ingredients remain the same.


Super Soft Hokkaido Loaf (750g loaf size)


Ingredients:

100g   Whipping Cream
100g    Magnolia Fresh Milk
1            Egg (60g)
40g        Caster Sugar
4g          Salt (3/4 tsp)
270g      Bread Flour
30g        Cake Flour
15g        Milk Powder
5g          Instant Dry Yeast (1 + 1/2 tsp)


Method:

Please refer to Creamily Aroma Hokkaido Toast for the detailed steps using the ingredients above and you will get these Super Soft Hokkaido Loaf.

A Beautifully Baked Super Soft Hokkaido Loaf

Can you see many "holes" in the sliced bread?

I am using the Bread Cutting Guide and the sliced bread falls to lean on it. This is how Super Soft the Hokkaido Loaf is. Try yours today!